
If you’ve received a packet of native seeds from Wild Ones Greater Cleveland, specific seed information can be found here. Need to know how to plant your seeds? First, you must look at the germination code found on the label of your seed packet. (Can’t find your germination code? Click here!) Then, read the germination descriptions below to learn what your seeds require. Finally, choose one of the methods listed below and follow the instructions for starting your seeds.
Portions of the following text are modified from Prairie Moon Nursery. You can download a printable winter sowing guide here.
The seeds of many native plants have built-in dormancy mechanisms that protect them from germinating before killing frosts or in times of drought. In the wild, seeds will lie dormant until the proper conditions for growth occur. In cultivation, the successful gardener must become familiar with several simple pre-sowing seed treatment methods which will unlock the dormancy mechanism and stimulate quicker, more consistent germination.
*SPECIAL NOTE – Until you are ready to plant or apply pre-sowing treatment, seed should be stored in an open container in a cool, dry place, or in a sealed (airtight) container under refrigeration (33-38°F). Avoid rapid or frequent changes in temperature or humidity and protect against rodents.
Germination Codes
Germination Code A: Seeds will germinate without pre-treatment.
Germination Code C(#): Seeds require a period of cold, moist pre-treatment (stratification) for at least the number of days specified in parentheses. Sow seeds outdoors in the fall to over-winter naturally and see germination the following spring, or winter sow seeds in containers. A more advanced method includes artificially stratifying. For more detailed instructions on artificial stratification, see Prairie Moon’s germination resources.
Germination Code D: Seeds that are very small or need light to germinate should be surface-sown. Cover only with a light dusting of sand. Do not let soil dry out until seedlings are established. If sowing seeds in containers, water from the bottom as necessary.
Germination Code H: Seeds need scarification: These species require weakening of the seed coat in order to come out of dormancy. Scarify by rubbing seed between two sheets of medium-grit sandpaper. The goal is to abrade seed coats – stop if seeds are being crushed. Scarification should be done before stratification, if needed. Fall or winter sown seed should not be scarified to prevent the chance of premature germination and winter kill.
Germination Code I: Seeds that are legumes (member of the pea family) harbor beneficial bacteria called rhizobia on their roots. Genus-specific strains of this bacterium called inoculum can aid in the fixation of atmospheric nitrogen and improve long-term health of native plant communities. Inoculum is naturally occurring in most soils and additional amendments are not needed.
Direct Outdoor Sowing for All Germination Codes
Direct outdoor sowing means you will be sowing your seeds in the area where you want them to grow. Doing this between late fall and early spring is a practical and efficient technique that allows seeds to germinate in their natural timeframe. This is especially true when planting many different species. When outdoor sowing in this way, it is good practice to plant on a weed-free site, clear of vegetation. The requirements for each species vary, but a good rule of thumb is to plant the seed NO DEEPER than the width of the seed. Species with very small seeds should be surface-sown, then firmly pressed to make sufficient contact with the soil. If you expect to move the plants once mature, it works best to sow the seed into rows. Mark the rows well and keep weed-free and well thinned.
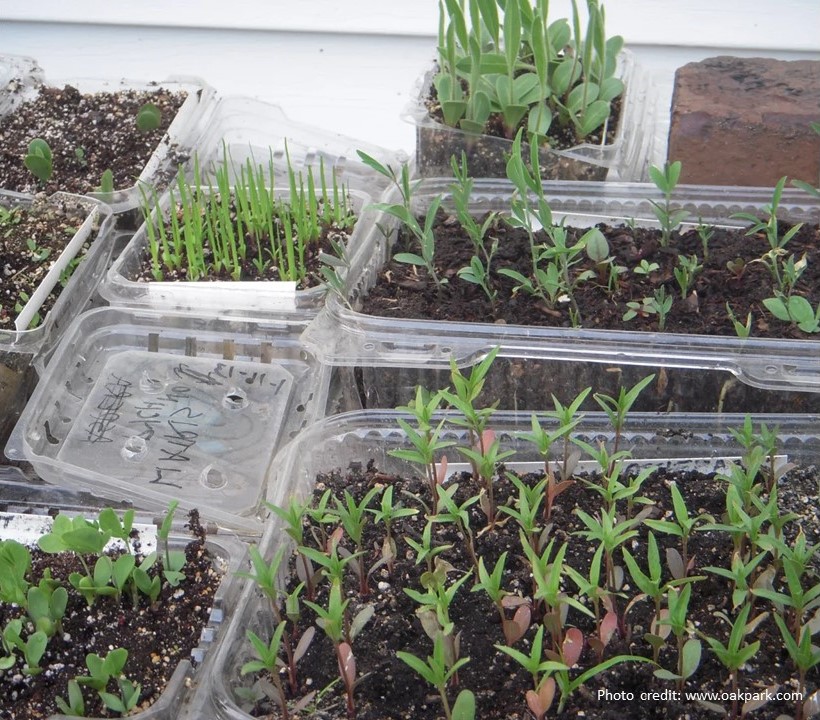
Winter Sowing in Closed Containers
As stated above, using natural temperatures to break dormancy and allow seeds to germinate at the right time in the spring is very efficient. Sowing seeds in a closed container can increase germination and seedling survival rates by protecting them from being eaten or getting washed away. This method requires simple supplies –no need for heat mats or grow lights. Winter sown seedlings do not require hardening off and are stronger and sturdier than those grown under artificial means.
In Northeast Ohio, the best time to winter sow is December through February. The exact timing for sowing a particular species is based on its germination requirements (see germination codes above). You will be most successful if you understand the needs of the seeds you want to grow and proceed accordingly. For example, sowing a species that is coded C(90) in late February will probably yield poor results as there isn’t sufficient time for the seeds to experience the necessary cold temperatures needed to stimulate germination.
Supplies needed:
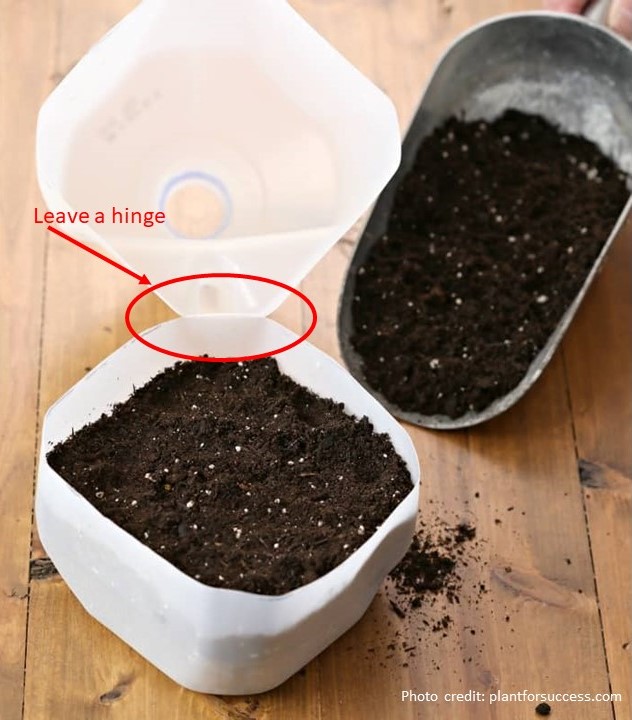
Containers: Plastic; milk jug, lettuce clamshell, etc. Containers should be large enough to hold at least 4 inches of soil, have drainage holes in the bottom and the top should be clear/translucent with ventilation holes. If using a milk jug or other closed translucent container that does not already have a lid, it will need to be cut in order to create a bottom and top portion. You can leave a portion uncut to create a hinge. (best choice for milk jugs) Containers should also be sturdy enough to withstand weather, allow room for both root and shoot growth, and have easy to access for checking on, watering and transplanting seedlings.
Soil: Good organic potting mix that is sterile (peat based and coconut coir based are most popular). Pre-moisten your soil. You want it damp enough that it feels wet and it isn’t crumbly but not dripping wet. Do not use straight compost or top soil or re-use old potting soil.
Seeds ~ Scissors or knife ~ Plant labels ~ Waterproof Permanent Marker (garden, laundry,
wax China) ~ Duct tape or zip ties or wire ~ drill or awl or sharp nail
Directions:
- Using a drill, awl or sharp nail –poke drainage holes in the bottom of your container. Make at least 4-6, depending on the size of your container If using a milk jug, leave the cap off for top ventilation. If using a container with a lid like a clamshell, poke holes in the top for ventilation.
- If using a container that needs to be cut, like a milk jug, cut it so that you have at least 4” on the bottom for soil depth and leave bout 1.5” uncut at the base of the handle to create a hinge.
- Fill the container with your soil medium. Tap the container on a hard surface a few times to settle soil and remove air pockets.
- Sow the seeds by sprinkling them around the surface of the soil –avoiding the edges of the container. Lightly press seeds into soil with your palm. Refer to seed germination codes for how deep they need to be and cover with more soil mix. As a rule, seeds should be covered only as deep as they are wide. Very small seeds (Germination code “D”) should be surface sown and covered with sand instead of soil.
- Create a plant label with name of species and date sown. Place in soil so that it is mostly covered. You may also want to label on the inside of the jug. **SPECIAL NOTE –even permanent garden markers fade after being exposed to sun and rain, so it is a good idea to label your containers in several ways to ensure you will have some way of knowing what they are come spring. You could also try a color/number coding system with a written key that you keep indoors.
- Seal the container. If your container has been cut, seal it shut using duct tape or punch holes to use zip ties, wire, pipe cleaners, etc.
- Place the container in an area that receives winter sun and will be exposed to the elements. Do not place the container under eaves or on a covered porch, but do place them in such a way that they are protected from blowing over in the wind or being knocked over by animals. (up on a table, inside a milk crate, etc.)
- Check on your containers once temps begin to warm during the day to ensure they are staying moist. You shouldn’t need to water them for several months. Once the seeds have sprouted and temps are around 50 or so during the day, begin opening your containers during daylight hours, but close them back up if temps drop much below that at night. Native seedlings are hardy but can still be killed by frost.
- Once seedlings have several sets of leaves and the container is becoming crowded, separate into clumps of 3-4 seedlings and plant up into a larger container or directly into your planting area.
Download guide
Download and print our winter sowing handout below!